AppSuite:Client Onboarding
Configuration guide for Open-Xchange Client Onboarding
With Open-Xchange Server v7.8.1 a new module is added allowing users to integrate several different clients and devices with Open-Xchange; such as providing a link to a commercial App Store to install certain apps on mobile devices.
By default, Open-Xchange ships with several built-in providers; thereof
- CalDAV
- CardDAV
- OX Mail App
- OX Drive App
- Connector for Microsoft Outlook®
- Sync App for Android
- Microsoft ActiveSync
- eM Client
- Mail (IMAP/SMTP)
- Generic Mobile App provider
Those providers allow accessing and/or synchronizing with certain data held by Open-Xchange on a supported device.
Installation
To install the Client Onboarding module, the package open-xchange-client-onboarding needs to be installed.
Moreover the property "com.openexchange.client.onboarding.enabled"; in installed file /opt/open-xchange/etc/client-onboarding.properties needs to be set to "true" (default). So getting rid off the entire client on-boarding module simply requires setting the mentioned property to "false" (and executing /opt/open-xchange/sbin/reloadconfiguration command-line tool).
Onboarding scenarios
The way to specify what and how a certain device is able to get “on-boarded” is mainly determined by so called scenarios. A scenario describes what gets deployed using which providers that contribute their onboarding possibilities and how it is made accessible to the client’s device.
A scenario consists of the following configuration attributes/options
- A unique scenario identifier
- A flag determining if scenario is enabled or not. If set to 'false' the scenario will not be available, useful for testing/enabling the scenario later on
- A scenario type, which is one of "plist", "manual", or "link"
- "plist" for generating a PLIST configuration file for iOS and OSX devices,
- "manual" for a description for the user for a manual set-up/configuration
- "link" for a link/URL to either Apple App Store / Google Play Store or to downloadable executable
- The "link" attribute, which is only considered it type is set to "link". That attribute consists of the sub-attributes "url" and "type".
- "url" provides the actual link/URL to Apple App Store, Apple Mac Store Google Play Store or to downloadable executable. For specifying a property that provides the actual link, please use special "property" scheme; e.g. "property://com.openexchange.client.onboarding.app.mylink"
- "type" indicates if "url" holds a link for either Apple App Store, Apple Mac Store or Google Play Store. Must only be specified in case "url" points either of those commercial stores. Supported values are "appstore", "macstore" and "playstore"
- The identifiers for the providers, which contribute to the scenario;
please check command-line tool /opt/open-xchange/sbin/listonboardingproviders to check, which ones are available
- The identifiers for alternative scenarios. This is typically used to provide alternative manual setup possibility.
- The comma-separated names of Font Awesome icons that are supposed to be displayed for the scenario
(only the ones from v4.4.0 are currently supported)
- The translatable display name; check
/opt/open-xchange/sbin/parsei18nyamlcommand-line tool to generate a .pot file from translatable texts - The translatable description; check
/opt/open-xchange/sbin/parsei18nyamlcommand-line tool to generate a .pot file from translatable texts
Onboarding providers
As described in the previous section, a scenario specifies what providers contribute to it. A provider represents a certain App or (synchronization) protocol that a device can install, download and/or communicate with.
Moreover a provider specifies what Onboarding types are supported ("plist", "manual", and/or "link"). Hence, once a provider is chosen to contribute to a certain scenario, the supported on-boarding type needs to match the one of the scenario itself. E.g. a scenario, which indicates to be of type "link", will always fail if the associated provider signals to support types "plist" and "manual".
To check what providers are available on your system, please execute the /opt/open-xchange/sbin/listonboardingproviders command-line tool, which outputs something like:
Each provider might require one or more capabilities/permissions to be available for the requesting user. If capabilities/permissions are not satisfied, the associated scenario cannot be applied, but will be displayed to the user for upsell opportunities.
Generic Onboarding provider for Apps
Identifier: app
The generic onboarding provider for apps allows specifying custom scenarios of type "link" for arbitrary links/URLs pointing to Apple App Store, Apple Mac Store Google Play Store or to downloadable executable. The link can be set directly or via a property.
This provider requires no capability/permission.
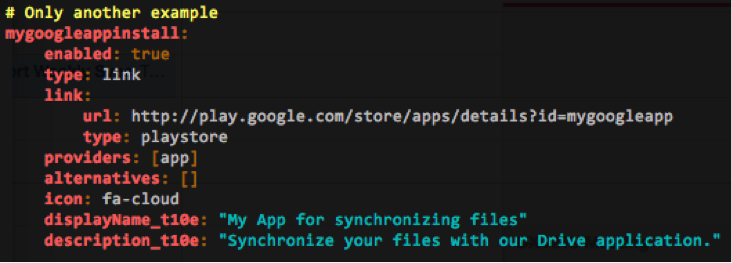
An exemplary section in the /opt/open-xchange/etc/client-onboarding-scenarios.yml YAML file might look like (check "Configuring Onboarding scenarios" chapter for more details):
CalDAV/CardDAV
Identifiers: caldav & carddav
In order for a scenario (having CalDAV/CardDAV in its provider listing) to be executable by a user, the "caldav" capability and "carddav" capability respectively are required.
Moreover, the appropriate *DAV end-points are supposed to be configured through property com.openexchange.client.onboarding.caldav.url in client-onboarding-caldav.properties file and property com.openexchange.client.onboarding.carddav.url in client-onboarding-carddav.properties file.
Drive/Mail Apps
Identifiers: driveapp & mailapp
Open-Xchange ships with built-in providers for Drive App and Mail App. The Drive-associated providers do require the "drive" capability and the Mail App requires the "mobile_mail_app" one.
The appropriate links to the apps in the corresponding stores are configured in associated .properties files:
client-onboarding-driveapp.propertiesclient-onboarding-mailapp.properties
By default the links to the official apps are set, but may be changed to ones for branded versions.
Drive Windows Client
Identifier: drivewindowsclient
The provider for the windows Drive Client. Requires the "drive" capability, but has no configuration options. However, this provider requires the "open-xchange-drive-client-windows" and the orderly configured binaries (e.g. through installing appropriate package according to the brand).
Please check this documentation for more details.
Mail (IMAP/SMTP)
Identifier: mail
The provider for deploying the IMAP/STMP account on target device using native/stock mail app. All IMAP/SMTP related settings are settable in file 'client-onboarding-mail.properties'.
Microsoft ActiveSync (EAS)
Identifier: eas
Configures the ActiveSync account on target device. Allows specifying the EAS end-point through com.openexchange.client.onboarding.eas.url property in 'client-onboarding-eas.properties'.
OX Updater
Identifier: oxupdater
The provider offering the download for the OX Client Updater (http://oxpedia.org/wiki/index.php?title=AppSuite:Open-Xchange_Updater). The provider is available as soon as the according package is installed and at least one product can be installed/updated via it by the user. A pre-configured scenario 'oxupdaterinstall' is already contained in /opt/open-xchange/etc/client-onboarding-scenarios.yml.
Configuring Onboarding scenarios
Onboarding scenarios are configured through the /opt/open-xchange/etc/client-onboarding-scenarios.yml YAML file. Each scenario starts with its own "section" in that YAML file by typing its unique identifier. All further attributes as outlined in chapter "Onboarding scenarios" are nested below that identifier.
Easily enabling/disabling scenarios
By default, Open-Xchange ships with a set of pre-defined scenarios that might apply to the most common installations. Each scenario can easily be enabled/disabled through its "enabled" Boolean attribute in the /opt/open-xchange/etc/client-onboarding-scenarios.yml YAML file. Executing /opt/open-xchange/sbin/reloadconfiguration command-line tool applies the changes without the need for restart.
Translatable strings
Those attributes ending with "_t10e" refer to localizable strings and are placed into "client-onboarding-scenarios.pot" file. Once such attributes ending with "_t10e" are changed/customized and/or added, the appropriate "client-onboarding-scenarios.pot" file needs to be re-created in order to get translated. For generating that "client-onboarding-scenarios.pot" file, please execute the /opt/open-xchange/sbin/parsei18nyaml command-line tool. That .pot file needs then be turned to the .po files for the individual languages.
Thus changing any of the attributes ending with "_t10e" requires (provided that appropriate .po files are available in /opt/open-xchange/i18n directory) either a restart or executing /opt/open-xchange/sbin/reloadconfiguration command-line tool together with stop/start of the "com.openexchange.i18n" bundle.
Scenarios' scope and order
While the previously mentioned "enabled" attribute offers some kind of generic on/off switch, the properties outlined in this section allow defining the device-scope for a scenario and in which order/precedence they are offered to the client. Scope in terms of
- For what devices (from the set of those specified by providers) are what scenarios in which order available and
- For which users they are available
As explained above, each scenario specifies one or more type-compatible providers associated with it. In turn, each provider determines to which devices the scenario applies. In order to further control, which device and which users are allowed to access a certain scenario, there are appropriate options available in file /opt/open-xchange/etc/client-onboarding.properties. Every option is fully config-cascade aware and therefore can be controlled on a global, per context set, per context and per user basis.
Thus, to make a scenario available for certain devices (as dictated by scenario’s providers) and for users as well, the scenario identifier needs to be added to the appropriate properties ending with ".scenarios" (for devices) and added to the "com.openexchange.client.onboarding.enabledScenarios" property (for user) as well.
The following properties accept a comma-separated list of scenario identifiers. The order of listed scenarios reflects the order in which they are offered to the client
com.openexchange.client.onboarding.apple.mac.scenarios
com.openexchange.client.onboarding.apple.ipad.scenarios
com.openexchange.client.onboarding.apple.iphone.scenarios
com.openexchange.client.onboarding.android.tablet.scenarios
com.openexchange.client.onboarding.android.phone.scenarios
com.openexchange.client.onboarding.windows.desktop.scenarioscom.openexchange.client.onboarding.enabledScenarios
Example:
com.openexchange.client.onboarding.apple.iphone.scenarios=mailappinstall, driveappinstall, eassync, mailsync, davsync
This exemplary setting specifies that Mail App, Drive App, EAS, Native Mail (IMAP/SMTP) and CalDAV/CardDAV are available in given order for iPhone devices.
Once a scenario is made accessible through configuration it is visible to users trying to perform a client onboarding using one of associated devices. However, whether a user is effectively allowed to execute that scenario is determined by the required capabilities of the denoted providers; if not allowed it gets displayed as an upsell opportunity.
Configuring actions
The type for a scenario determines what actions are associated with it to "transport" the onboarding information to the client. The types "manual" and "link" only show static information like displaying a link. In contrast the type "plist" allows several actions to transport the configuration profile onto the client. Thereof
- SMS
In order to utilize the "E-Mail" action, a special transport must be configured for system-composed E-Mails as it is for using the sharing functionality. This transport is configured in noreply.properties. All properties therein are config-cascade capable, so their values can be sensitive to the current user or context.
Using the SMS action requires an according implementation being available. OX App Suite comes with an optional sipgate implementation. Please check this documentation how to setup App Suite accordingly.
Implementing your own SMS gateway
To use an SMS gateway other than sipgate, you can provide your own implementation. Therefore the Java interface com.openexchange.sms.SMSServiceSPI needs to be implemented and published as an OSGi service. For parsing phone numbers provided by users com.openexchange.sms.PhoneNumberParserService can be used. That one is also available as an OSGi service and can be tracked accordingly. You can have a look at bundle com.openexchange.sms.sipgate as implementation reference.
Important: You must not install the open-xchange-sms-sipgate package if you provide your own implementation.
PLIST-signing
Scenarios of type "plist" require having PLIST-signing enabled. Otherwise the device will show a warning when importing a received PLIST configuration profile. Please follow the instructions as outlined in this article how to enable and configure signing for PLIST files.
Adding custom scenarios
The first thing to do, is to add an appropriate scenario configuration to the 'client-onboarding-scenarios.yml' file; e.g.
mygoogleapp:
enabled: true
type: link
link:
url: http://play.google.com/store/apps?id=mygoogleapp.invalid
type: playstore
image: http://my.fine.host/image001.png
providers: [app]
alternatives: []
icon: fa-cloud
displayName_t10e: "My App for synchronizing files"
description_t10e: "Synchronize your files with our Drive application."
The next step is to make that scenario accessible through adapting 'client-onboarding.properties' file. Hence, the scenario identifier needs to be added to the devices, to which it applies (Android devices in this case):
com.openexchange.client.onboarding.android.tablet.scenarios=..., mygoogleapp
com.openexchange.client.onboarding.android.phone.scenarios=..., mygoogleapp
Furthermore, that scenario needs to be made accessible to users as well:
com.openexchange.client.onboarding.enabledScenarios=..., mygoogleapp
At last, a .pot file is supposed to be generated from the translatable strings using /opt/open-xchange/sbin/parsei18nyaml command-line tool to yield the .po files for the individual languages.
Provided that target users do hold appropriate capabilities, they are allowed to execute that scenario. In the example above the "app" provider is specified, which does no require any capabilities. Hence, that scenario is available.
HowTos
How can I quickly setup a default/test configuration ?
- Install open-xchange-client-onboarding package
- Edit
/opt/open-xchange/etc/client-onboarding.propertiesand setcom.openexchange.client.onboarding.enabledtotrue - Edit
noreply.propertiesto enable autoconfig sending via email. PS: Have a fully working smtp login available like “noreply@yourdomain.tld” - Edit client-onboarding-scenarios.yml and set “enable” for : “driveappinstall” , “davsync” “davmanual” “mailsync” “mailmanual” to
true - Now set the correct caldav/carddav server FQDNs in the corresponding files for your setup
client-onboarding-caldav.propertiesclient-onboarding-carddav.properties
- Restart OX process
- Login to AppSuite. Click on Settings - Connect your device
- Verify that you have following onboarding options available:
- windows -> imap/smtp details
- android/fon+tablet -> imap/smtp details
- android/fon+tablet -> drive app
- apple -> iphone -> imap/smtp config button
- apple -> iphone -> imap/smtp details for experts
- apple -> iphone -> calendar/addressbok -> config button
- apple -> iphone -> calendar/addressbok -> details for dav setup
- apple -> iphone -> drive app
- apple -> ipad -> imap/smtp config send email
- apple -> ipad -> imap/smtp config button
- apple -> ipad -> imap/smtp details for experts
- apple -> ipad -> calendar/addressbook config send email
- apple -> ipad -> calendar/addressbook config button
- apple -> ipad -> calendar/addressbook details for experts
- apple -> ipad -> drive app
How can I quickly disable a certain scenario
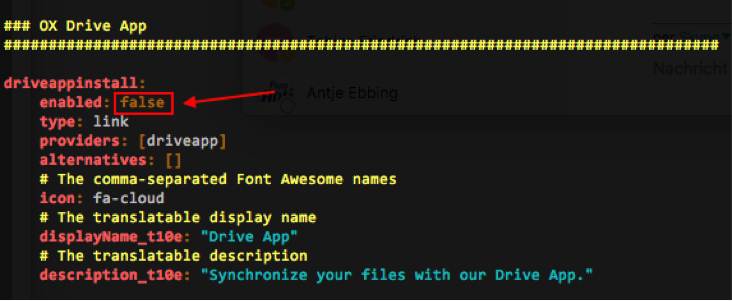
Simply enter the 'client-onboarding-scenarios.yml' file and go to the section specifying the target scenario. Switch the 'enabled' flag to "false" and execute /opt/open-xchange/sbin/reloadconfiguration command-line tool.
E.g. to disable the OX Drive App:
How can I disable the outdated ui parts like 'Downloads'?
The wizard replaces and extends the functionality of the old Download Section in settings and the corresponding widgets. We recommend to disable these outdated parts:
- widget: get ox drive
- widget: update
- settings entry: downloads
Remove settings section 'Downloads'
Edit /opt/open-xchange/etc/settings/appsuite.properties and add or change the value to true:
- io.ox/core//settings/downloadsDisabled
Remove widgets
To remove the both related portal widget/tiles please refer to the portal plugins wiki page
- io.ox/portal/widget/oxdriveclients
- io.ox/portal/widget/updater
How can I add my own App?
Provided that the App is accessible by a link (pointing to a commercial App Store or to a downloadable executable/installer), the generic "app" is the suitable provider to choose.
Hence, an appropriate section is supposed to be added to the 'client-onboarding-scenarios.yml' file having a unique name and "provider" attribute set to "[app]":
mygoogleapp:
enabled: true
type: link
link:
url: http://play.google.com/store/apps?id=mygoogleapp.invalid
type: playstore
providers: [app]
alternatives: []
icon: fa-cloud
displayName_t10e: "My App for synchronizing files"
description_t10e: "Synchronize your files with our Drive application."
The attribute "type" needs to be set to "link".
The attribute "link" should be configured with:
- "url" sub-attribute containing the actual link pointing to the URL location
- "type" sub-attribute specifying of what type that link is: either "appstore", "macappstore", "playstore" or "common".
The type "common" is supposed to be used for links that do not point to a commercial App Store, but to a downloadable executable/installer file.
The "icon" attribute is supposed to contain a comma-separated list of Font Awesome icons (only the ones from v4.4.0 are currently supported) that represent the App; e.g.
- "fa-cloud" for Drive/file-related nature
- "fa-calendar, fa-users" for Calendar and Address Book synchronization
- "fa-envelope-o" for Mail nature
Next, the translatable display name and description should be set through setting the attributes "displayName_t10e" and "description_t10e". As described previously, executing the /opt/open-xchange/sbin/parsei18nyaml command-line tool yields an appropriate .pot file, which can then be used for generating the individual .po file for the different translations.
Finally, the 'client-onboarding.properties' file needs to be modified to specify the "scope" for that new scenario. Add the scenario’s unique name to the appropriate device properties and add it to "com.openexchange.client.onboarding.enabledScenarios" property as well.
After executing /opt/open-xchange/sbin/reloadconfiguration command-line tool the new client onboarding scenario is available for the selected users/devices.
How can I upsell my own app?
Having the same prerequisites/steps as for "How can I add my own App?" the scenario description in the 'client-onboarding-scenarios.yml' file simply needs to be extended by the desired capabilities, which are supposed to be used for managing the upsell.
Example
mygoogleapp:
enabled: true
type: link
link:
url: http://play.google.com/store/apps?id=mygoogleapp.invalid
type: playstore
capabilities: "mygoogleapp_capability"
providers: [app]
alternatives: []
icon: fa-cloud
displayName_t10e: "My App for synchronizing files"
description_t10e: "Synchronize your files with our Drive application."
The special "capabilities" attribute is only supported for scenarios of type "link" with the special "app" provider.
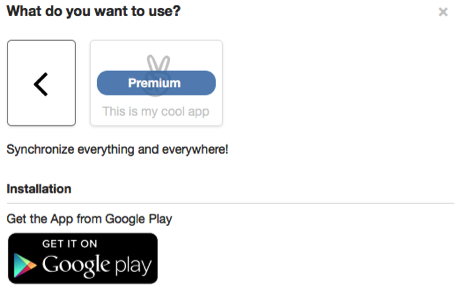
With such a "capabilities" attribute only users, which have the "mygoogleapp_capability" capability are allowed to get the link. For those who don’t, the upsell opportunity will be displayed; e.g.


